Creating crafts from paper and glue is a simple and exciting way to keep a child busy without leaving home. This kind of leisure will contribute to the development of imagination, fine motor skills and perseverance. We offer 8 interesting ideas for co-creation with children.
- Toys
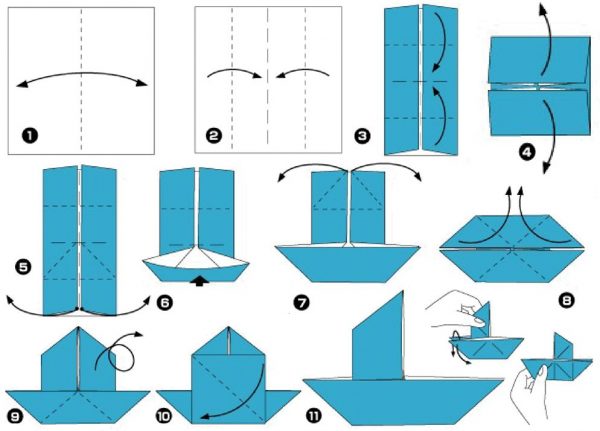
- Colored paper boat
- Shooting gun
- Flowers and decorations
- Rose origami
- Chamomile from colored paper
- Paper ball
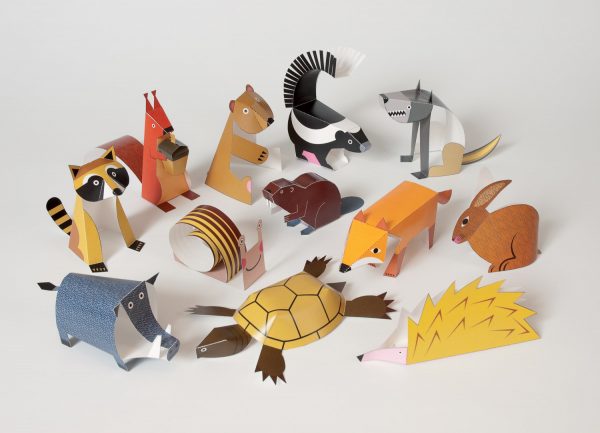
- Animals
- Owl made of colored paper
- Volumetric fish
- Paper butterfly
Toys
Crafting real toys from improvised products is doubly useful and entertaining. The child will be happy to build a paper ship or a shooting gun with his own hands, and then find such products in the game, introducing himself as a ship's captain or a brave soldier.
to contents ↑Colored paper boat
Fans of marine subjects will definitely appreciate the lesson on folding colorful boats. All that is needed for this is sheets of dense colored paper. Instruction:
- We take a sheet of A4 size and cut it on one side so that we get a square.
- We outline the center lines horizontally and vertically.
- The lower half of the square is separately doubled.
- Turn the workpiece over.
- Bend the bend outward towards the line in the center.
- We create the side of the ship by bending the lower squares to the sides and forming triangles from them.
- Move the top of the paper structure to the bottom wall, then bend it up, leaving a fold along the border of the main part of the vessel.
- Again, we narrow the upper parts to the center, having previously bent the side corners, and open the figure along these lines.
- We unfold the boat on the outside and paint it with colorful pens and felt-tip pens.
Shooting gun
A shooting paper pistol is an unusual craft, which every boy will be glad to craft. In addition to color sheets, the following materials and tools will be needed here: hot-melt adhesive, thin adhesive tape, a ruler, a ballpoint pen spring and bank rubber bands for money. Manufacturing Technique:
- We take the sheet and twist it into a tube diagonally, starting from the corner, and fix it with tape so that it does not unwind.
- Making the pipe thicker. To do this, we wind another sheet on top of the first tube and fix it with tape along the entire length. After this, the tubes should be disconnected.
- Repeat the same steps two more times to get three wide straws.
- We cut them so that the output is: 7 pieces of 5 cm (for the handle), 2 pcs. 15 cm (for the trunk) and 1 pc. 8 cm long (for the trigger).
- We make the handle of the gun, gluing short segments obliquely.
- We glue the “trigger” so that its right edge protrudes about 3 cm beyond the handle.
- Glue the remaining 2 tubes 15 cm long on top. The base for the gun is ready.
- We proceed to the assembly of the trigger. To do this, twist two narrow tubes.
- Carefully bend one of them with the letter U and insert one end into the trigger, and the other into the extreme tube of the handle. We cut off the excess.
- The second is used to create a safety bracket. We attach the tip to the second handle pipe from above. And we glue the free edge to the lower wall of the barrel, saving space for the trigger.
- We twist a long tube and flatten it. We glue the handle and the trigger guard around the entire perimeter with the resulting strip.
- Now we insert the spring into the upper tube of the handle, and then the trigger for the descent.
- It will take another tightly twisted tube. We bend its edge, place several stationery gum on the bend and glue the structure well with a heat gun and adhesive tape.
- We place the made part in the lower tube of the barrel.
- We stretch the elastic band and hook it between the front walls of the tubes.
- The paper weapon is done! We charge it with bullets or balls rolled from paper and select it at the target!
Flowers and decorations
While the boys shoot home-made weapons and drift across the expanses of the sea on their own ships, the girls can create paper bouquets and decorations.
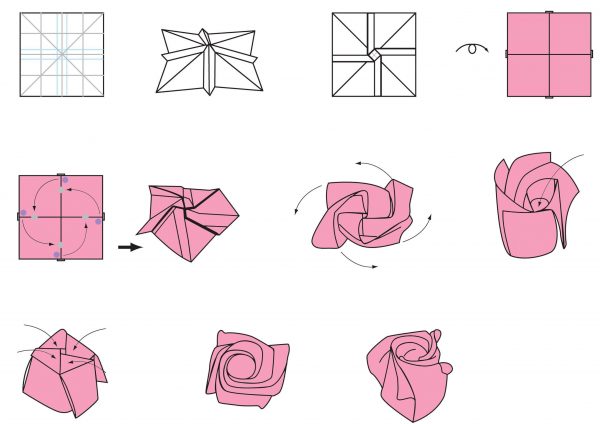
Rose origami
The process of creating a flower:
- Shape the landscape to a square.
- Fold it in two diagonals, expand it, and then bend it horizontally.
- Bend the side triangles inward so that parts of the line touch. It will turn out a double triangle.
- The lower corners of its base both from the front and from the back should be turned up to the top.
- To connect the left and right parts of the figure together with one, and then with the other side.
- Bend the sides to the middle, slightly overlapping, and fix by inserting the left corner into the adjacent pocket. Repeat for the opposite side.
- At this stage, a bud has already been outlined with a small hole at the bottom. It can be slightly expanded using a toothpick. Then blow into the hole so that the bud straightens and gains volume.
- Bend the petals outward and twist slightly.
- Insert a straw into the hole.
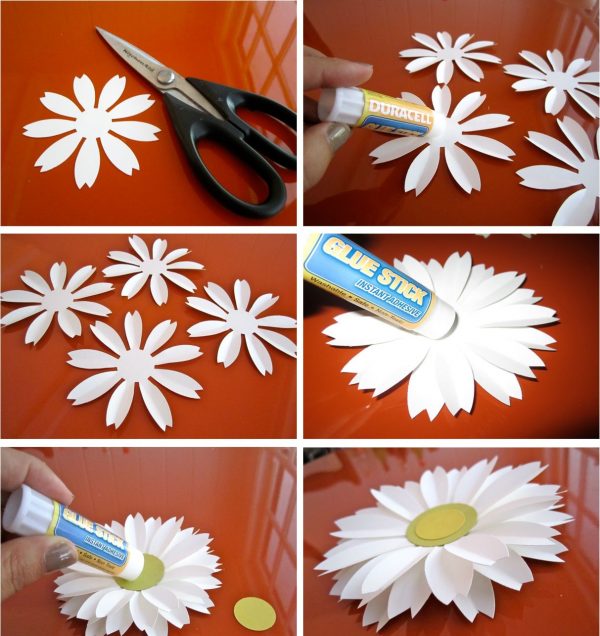
Chamomile from colored paper
To create a camomile, it is enough to take glue, as well as yellow and white paper. Now you need to follow a few simple steps that even the youngest needlewomen will cope with:
- For one daisy, cut 2 circles of yellow paper and 9 stripes of white.
- Form the petals by gluing the ends of each strip.
- Glue them to the circle-core. On the reverse side, also attach the middle.
- If desired, stems and leaves can be made from green paper, and then a beautiful bouquet can be arranged on cardboard.
Paper ball
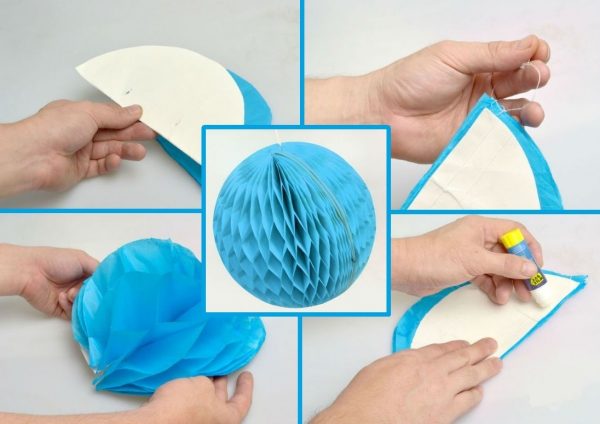
There are many options for making bulk paper balls. Let's talk about one of them. This will require:
- corrugated paper;
- white cardboard;
- glue stick;
- scissors;
- felt-tip pens;
- a compass or round object;
- needle with thread.
Stage creation of a ball:
- Draw on a cardboard a circle that will correspond to the size of the future ball, and cut it out.
- Divide the circle into two halves.
- From corrugated paper, cut 40 rectangles. The size of each piece should be such that it fits entirely on one semicircle.
- Take a sheet of cardboard and place it horizontally. Draw parallel vertical lines on it at the same distance from each other, alternating two colors (for example, red and green).
- Put a corrugated rectangle on the cardboard. Glue to draw stripes on one of the marking colors.
- Put the next sheet of corrugated paper on top and press it so that it firmly adheres to the first layer.
- Apply glue over again, only now with a different marking color.
- Connect all existing rectangles by this principle, constantly alternating adhesive strips.
- Cut the whole glued stack in a semicircle using the cardboard stencil from step 2.
- One semicircle of cardboard must be cut off at the base to make the letter C, and stick it on one side of the multilayer workpiece. The other semicircle must be glued to the second side unchanged.
- Next, loosen the product from two angles. In one, you can leave a thread for further hanging the ball.
- The final stage is the deployment of crafts and gluing cardboard parts.
Animals
Invite your baby to make an owl, fish or butterfly out of plain paper. The child will be able to use the made animal figures for decorating his own room, as well as when creating postcards and gifts for loved ones.
Owl made of colored paper
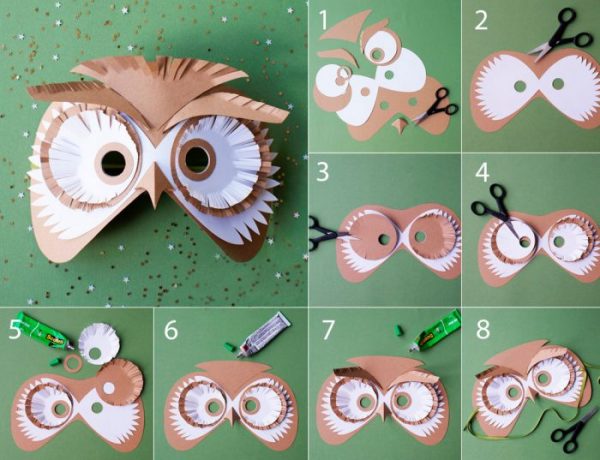
This version of the craft is perfect for classes with children of any age. To create an application in the form of an owl you need to have at hand only 2 pieces of paper or cardboard (preferably contrasting colors), scissors and glue. Working process:
- We make 3 shaped blanks for plumage of a bird.
- Cut and fold the muzzle: in the corner of a large triangle, glue a small beak.
- We proceed to the formation of the eye. To do this, we prepare three circles of different diameters (the middle one is a light shade, the remaining two are dark), we fold the eyes from them and fix with glue. Repeat the same thing again.
- We put the owl in this order: we stick the plumage, then the eyes and only then the beak.
- You can additionally paint the bird or partially decorate it with sparkles.
Volumetric fish
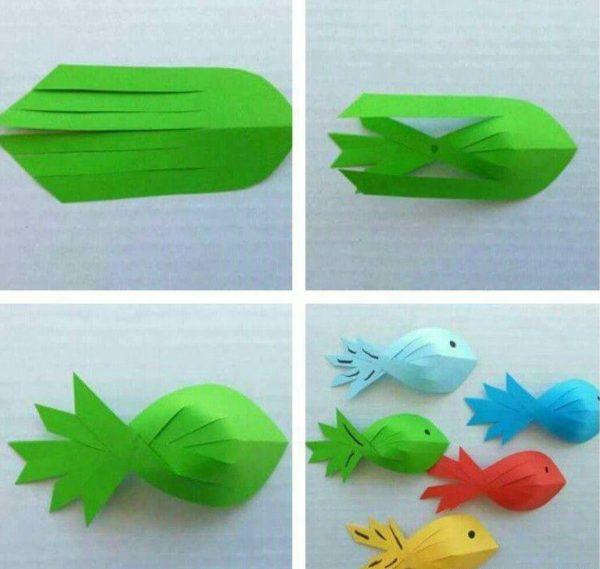
To make bright paper fish, you will need colored paper, glue, scissors, pencils. We start to create:
- Cut a square and fold it diagonally.
- We cut the corners, giving one of the sides roundness.
- We open and make 6 cuts for the subsequent weaving of the fish tail.
- Impose alternately cut strips on top of each other and glue them in the middle. You will get a magnificent tail, and the fish itself will gain volume.
- If you fasten a pair of identical blanks, you get a 3D craft.
- It remains to draw or paste the eyes and decorate the fish at your discretion.
to contents ↑Such an application will be a great decoration for a home-made card or a small gift box.
Paper butterfly
You can create a paper butterfly in two different ways. First option:
- Prepare a cardboard stencil: print a template with an image of an insect half on a printer, cut along the contour, transfer the picture to a cardboard and cut it out.
- Fold the paper in half, circle the stencil with a pencil at the bent edge, then cut and unfold.
- The winged beauty is ready. It remains only to paint it: add patterns or make openwork elements with a clerical knife.
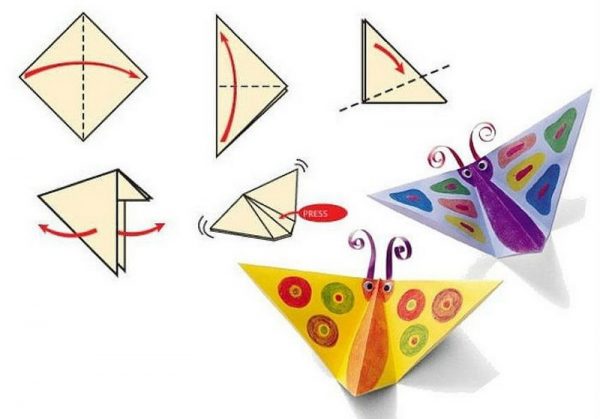
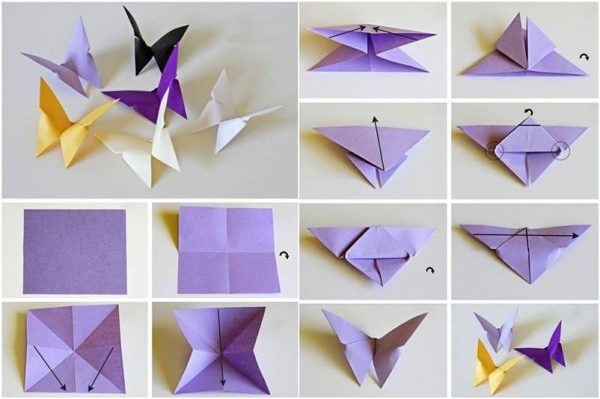
The second, more complex option:
- Prepare a square sheet and outline two diagonal folds.
- Fold the leaf in half horizontally, then bend the edges on both sides inward along the fold lines from the previous paragraph. Just as in the master class with a rose, a double triangle should form here.
- The lower corners of the front part must be bent up.
- Turn the workpiece back to you and bend the top of the triangle so that the angle intersects the edge of the figure.
- Wrap the protruding corner and carefully adjust the wings of the butterfly.
- Now you need to show imagination and paint the figure in bright colors.
We wish you inspiration and creative success! Tell us in the comments what crafts you do.

